Git & Tips: The Power Of Rebase

Gabriel
Today we are going to see what place has git rebase as part of the different tools Git puts at our disposal to update a branch, and how a complete and explicit use of this well-known command can sometimes solve complicated problems very cleanly and in one go.

3 simple ways to update your local current branch with its remote branch counterpart
git fetch+git merge origin/current-branch(aliased by the standardgit pull)git fetch+git rebase origin/current-branch(aliased bygit pull --rebase)git fetch+git reset --hard origin/current-branch
Although in our mind a branch represents one or more commits, it is important to keep in mind that from the Git point of view a branch is just a name that points to the last commit involved in what we think of as a branch.
If you didn’t add anything to the current branch
(We assume that the target branch has advanced.)
mergedoes a fast-forward (which you can prevent with the--no-ffoption), which mean that your current branch moves forward to the target branch.rebasemoves forward your current branch to the target branch, since there is no local new commit.reset --hardmoves the current branch to the target branch, regardless of local history.
So in this case, all three approaches lead to the same result.
Note that when you just want to get back the progress of a branch on which no commits are supposed to be added locally (which is sometimes the case for master), you can basically make your life easier with a reset --hard, because even if you’ve done something stupid locally before, it will be erased.
If you added something to the current branch
mergeadds one new merge commit (and therefore can require a single pass of conflicts resolution), but makes the history harder to read.rebasereplays (≠ moves) changes of each concerned commits of the current branch above the target branch (here the remote one) and makes the resulting history simpler to read, but may generate one pass of conflicts resolution for each new commit added to the target.reset --hardmoves the current branch (remember that it is just a pointer) to the target branch. So it does not keep any specific commits from the current branch. No conflict possible.
So when you want to update your local branch on which you have made some progress with the progress of it’s remote counterpart, you should weigh the interest of the rebase against the merge. If this branch is all about a simple feature, you may want to squash (i.e. unify all commits in just one) then rebase, which allows to keep the best of both solutions (i.e. minimize number of conflicts resolution passes + make the history easier to read afterward).
But some cases are more complicated and require extra care. In those cases, using git rebase --onto is actually a convenient way to resolve conflicts straightforwardly.
Understanding the basic rebase accurately
Reminder
- A
baserefers to the previous commit of the first significant commit of a branch. - For a developer, a
rebaseconsists in moving a branch from onebaseto another.
From a Git point of view, what’s called a base necessarily refers to a commit that you can either designate directly, or designate by the name of a branch pointing to it. As developers, it is our responsibility to choose the starting and ending bases according to the commits we want to move and their destination.
Example:
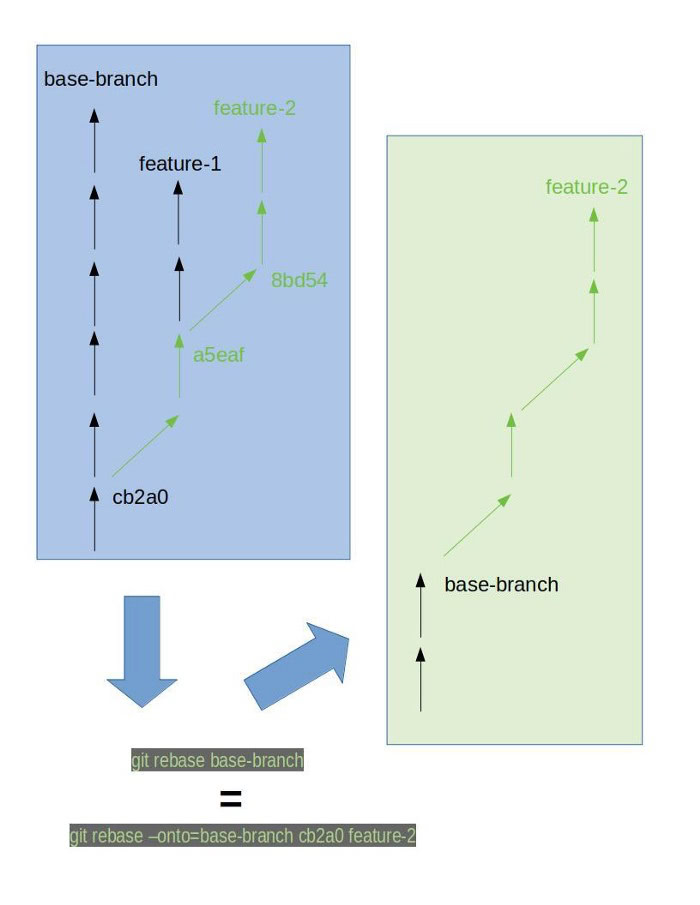
In the above example, the current branch is feature-2 and you’re doing a rebase on the target base-branch.
From a Git perspective, even the simplest rebase is implicitly like a git rebase --onto to which git implicitly adds the missing parameters.
git switch feature-2 # only if the HEAD is not on feature-2 yet
git rebase base-branch
is equivalent to:
git rebase base-branch feature-2 # works from anywhere
And is more explicitly equivalent to:
git rebase --onto=base-branch cb2a0 feature-2
Note that the cb2a0 commit is automatically chosen by git because it is the closest common commit between the base base-branch and the targetfeature-2.
what exactly is happening?
Git moves to base-branch then replays changes of each commits from the commit cb2a0 (NOT included) to the commit pointed by feature-2 (included).
Those replays will thus generate as many new commits. Once all of this is done, the feature-2 branch (as a pointer) is moved to the last new commit, and then the process is considered completed.
Understanding rebase --onto
The --onto option allows us to be more explicit about the bases involved. This is sometimes needed when the history of commits prior to the actual commits of a branch has been messed up by some arbitrary actions that cause the history to deeply diverge between the local branch and the remote branch.
Example
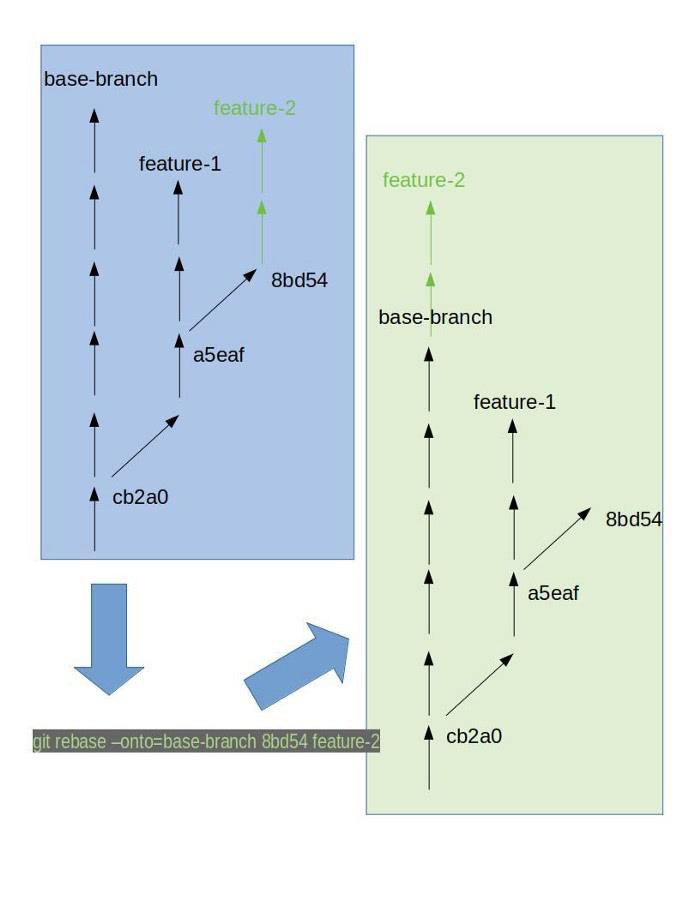
In this example, the current branch is still feature-2, but now the only significant commits of this branch are the two last ones.
So you want to replay (or “rebase”) only those two commits on the target base-branch. Here you have to give to the git rebase the --onto parameter.
git rebase --onto=target-branch 8bd54 feature-2
Which can be translated as:
Replay onto target-branch all commits between 8bd54 (not included) and feature-2, then move the feature-2 reference to the result.
Once the commits graph is in mind, rebase --into is finally a neat and simple way to solve this problem which otherwise could have caused some serious headaches.
Conclusion
Rebase in Git is a sharp and powerful tool, especially with the explicit — and sometime mandatory — --onto option, allowing us to replay specific commits from one place to another.
The explicit git rebase --into form is unnecessary most of the time, but learning how to master it is really worth it considering the difficulties it can solve in the blink of an eye.
Last but not least, never underestimate the benefits of pinpointing your current position in the Git versions tree on a very regular basis.
It is very helpful to get used to navigating in the versions tree and visualizing how all those Git commands behaves within it. To do so, consider to use your IDE’s git graph functionalities (derived from this kind of Git command: git log --graph --oneline --decorate --color), and making this graph your best friend!