Direct File Upload With Paperclip and S3-compatible Object Storage

Jean-Michel Gigault
As usual, I will take the opportunity of describing technical solutions to go further with the topic and talk about the why, the how and the whom, with the widest inclusive example I was able to cover.
If you are only looking for the technical guidelines, go directly to the third section, or even quicker: open attached source code ;-)
That being said, my name is Jean-Michel and I am a committed engineer at Per Angusta. We are building softwares for big companies to solve their need of Procurement Performance Management. We are coding with Ruby on Rails.
Direct File Upload principles
Implementing a file upload functionality is not an obvious challenge due to the multiple security concerns (summarised by OWASP) and the technical implementation, the later being the sole topic of this blog post.
Modern applications running on services like Heroku often have a connection to an Object Storage system behind the scene, in order to store files such as images and files uploads. Those applications therefore can face into multiple issues when they implement a simple upload interface that require data to transit through its layer. A user trying to upload a 100Mb file through such mechanism would lock a thread of the application during the file upload process, resulting in a reduced threads pool for other users to request the application (increased queue latency) and request timeouts due to hard limits of the hosting provider (the well-known H12 error on Heroku).

Be even more naive because request timeouts do not only occur with huge file uploads or downloads. Since the COVID-19 pandemic started, working from home has become an even bigger concern for application editors providing features based on data transfer, because of the bandwidth being more and more based on users’ personal Internet access. At Per Angusta, we have been able to monitor an increased latency due to Internet bandwidth, especially with US-based users who are usually less well equipped with Internet access than Europeans.
Direct File Upload consists in isolating the expensive data transfer between the Client and the Object Storage, bypassing the layer of the Application. The latter does only pilot the flow, handles the validations and handles expensive operations only in its controlled network. By “controlled network”, I mean both application and Object Storage are efficiently connected together with a stable bandwidth (for instance when both are hosted in the same data center).
This is exactly the same purpose of pre-signed expiry URLs commonly used to display images on, or download files from, websites that use modern Object Storage connectors (such as Rails’ ActiveStorage component).
The benefits of implementing Direct File Upload bring you the opportunity to increase the file size limits, which can be considered as a feature and not only a performance improvement.
Why ActiveStorage does not fit our needs
And why to write this blog post today meanwhile Paperclip is deprecated since 2018 by the maintainers in favour of ActiveStorage?
To start with, it’s worth noticing that Paperclip is not dead thanks to new active maintainers working on a fork named kt-paperclip. However, you would be well advised to start using, or to migrate to, ActiveStorage if you can. As part of Rails, this component has a guaranteed roadmap and qualified maintainers.
Thus, you may have good reasons for not choosing to migrate, as we decided until now:
- The lack of customisable Blob#key configuration, referred as “path” in Paperclip, and which my colleague Frantisek is by the way tackling in PR #41004 (please upvote!). Our use case is a base specification: As per our multi-tenancy strategy, we need to isolate files of clients in a clear manner, prefixing all keys with clients identifiers. Relying on ActiveStorage would force us to be dependent on the database stored keys to determine the files owners, resulting in painful (or even risky) maintenance operations such as isolated backups, archiving and reversibility procedure.
- ActiveStorage has a great design but stands totally different from Paperclip’s. As well as with ActionText, data is stored in separate and dedicated tables active_storage_blobs and active_storage_attachments, whereas Paperclip invites the domain-level models to store the attributes (there are alternatives, as chosen above in my example of implementation). Having not to rework the models and their interactions can be considered as a pragmatic decision. Especially if you deeply embraced Paperclip’s design, there is no absolute obligation, whenever the association “Paperclip + deprecation” is scary.
- Some other developers reported us a few edge cases or painful implementation of blob manipulation, such as post-processing. Because we are not concerned, this may be speculating :-) Those issues are not specific to ActiveStorage’s pattern, but another reason why keeping a working solution in place may remain a good choice until you face into a real issue with it.
Implementing Direct File Upload with Paperclip
Prerequisites:
- Paperclip (forked or even legacy)
- Fog::Aws and AWS S3 SDK
- S3-compatible Object Storage
- jQuery, jQuery-UI, jQuery File Upload
- PostgreSQL (if the primary key is part of the path builder, which is the default behaviour through :id_partition key)
- Multipart upload is not supported
Specifications:
- A model called Attachment, on which is implemented Paperclip with has_attached_file :upload.
- Domain-level models have many attachments through a polymorphic association named “attachable”.
class Attachment < ApplicationRecord
  belongs_to :attachable, polymorphic: true, optional: false  has_attached_file :upload
end
- To have the most inclusive example, this post and its related code source make the implementation of Direct File Upload compatible with Post Processing, Fingerprint, URI Obfuscating, :path setting that includes the primary key, and also multiple file uploads.
has_attached_file :upload,
  styles: { medium: '300x300>', thumb: '100x100>' },
  path: ':tenant/:class/:attachment/:hash/:style/:filename',
  hash_data: ':id/:extension/:fingerprint/:updated_at'
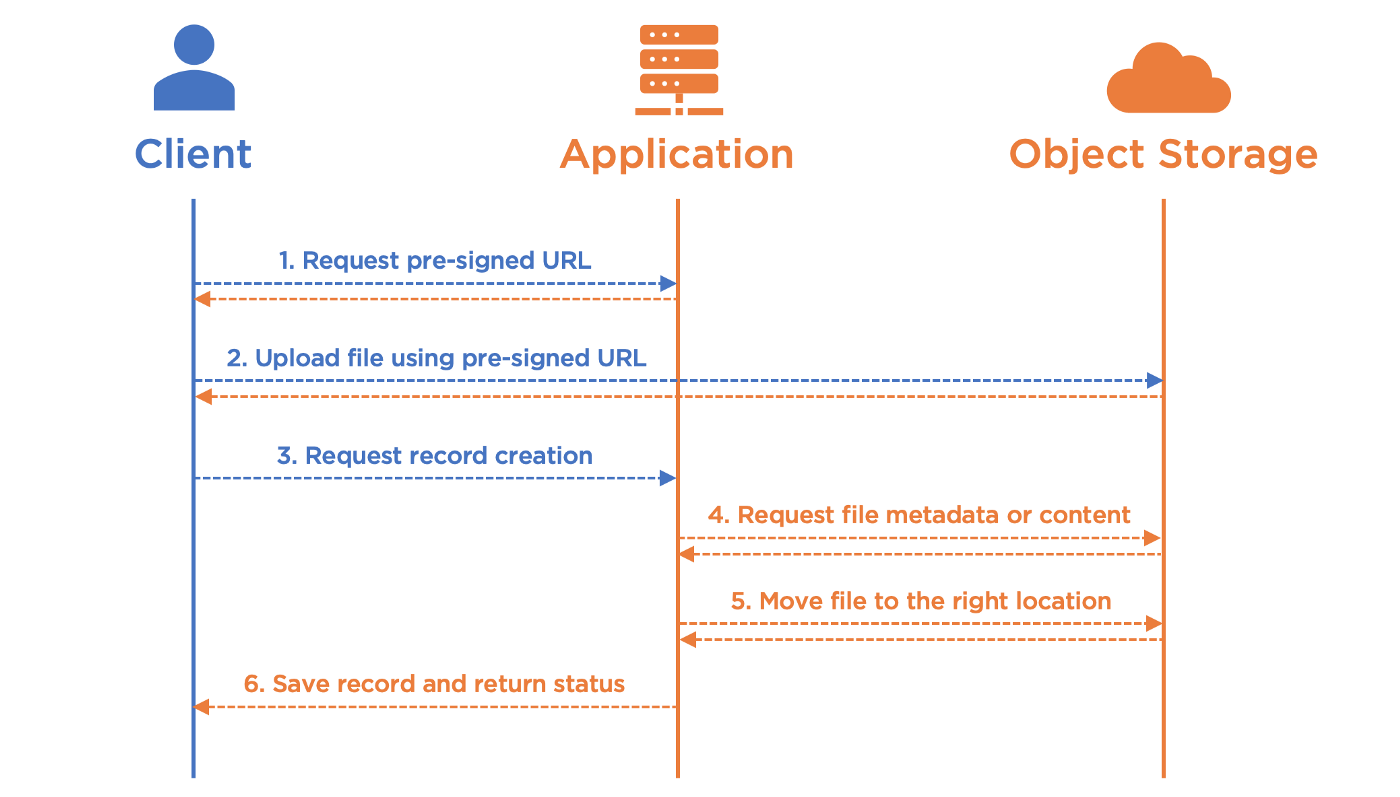
1. Request pre-signed URL
Let’s start with the assumption that your front page has a form with a file input, to which you have attached an event listener on submit:
function directFileUpload() {
  const form = $(this)
  const input = form.find('input[type="file"]')
  const files = input.prop('files')

  $.each(files, function (index, file) {
    // start upload process for each single file
    obtainPresignedURL(file)
  })
}

$(document).ready(function () {
  $('form[data-direct-file-upload="true"]').on('submit', directFileUpload)
})
For each single file, we start the sequence of requests by obtaining a pre-signed URL from an endpoint of the application with the following specifications:
- Method: POST
- URL: /direct_file_uploads
- Request parameters: The file name and file type, as provided by the browser from the file input
- Response: A pre-signed URL (upload_url) and a unique identifier (upload_key)
function requestPresignedURL(file) {
  $.ajax({
    url: "/direct_file_uploads",
    method: "POST",
    dataType: "json",
    data: {
      authenticity_token: <VALID_AUTHENTICITY_TOKEN>,
      file: {
        name: file.name,
        type: file.type
      }
    },
    success: function (response) {
      // go to step 2
      uploadFileUsingPresignedURL(file, response.upload_url, response.upload_key)
    }
  })
}
A controller handles the request and prepares a pre-signed URL with the following specifications:
- The upload_key is partially random to prevent from duplicates and to obfuscate the path to prevent clients from hacking other uploaded files.
- The upload_key retains the file name to strengthen the step 4, and also to facilitate debug.
- The actual path where the file will be uploaded (upload_path) must be partially built with a specific and hard-coded prefix (understand forced by the backend) in order to prevent clients from hacking and accessing other locations available in your bucket (there is no way to access parent directories using a path with S3, as you would expect on Unix using “..”).
- The file type is appended to headers in the field “Content-Type” to retain the typology of the file.
- The expiration of the link depends on your use case: The greater the size limit is accepted, the longer the expiry time must be. Think about choosing a short duration until you actually need to extend it.
- The upload_url is obtained using put_object_url on storage connection. A storage connection can be instantiated using Fog::Storage.new (please refer to the code source for an example).
class DirectFileUploadsController < ApplicationController
  # POST /direct_file_uploads
  def create
    upload_key  = "#{SecureRandom.uuid}/#{params[:file][:name]}"
    upload_path = "direct_file_uploads/#{upload_key}"    headers = { 'Content-Type' => params[:file][:type] }
    expires = Time.current + 60.minutes
    bucket  = Paperclip::Attachment.default_options[:bucket]    upload_url =
      STORAGE.put_object_url(bucket, upload_path, expires, headers)

    render json: { upload_url: upload_url, upload_key: upload_key },
           status: :created
  end
end
2. Upload file using pre-signed URL
Once pre-signed URL is obtained, the browser si expected to start upload to it. In this example, I have been using the jQuery plugin called jQuery File Upload for compatibility, but you can adapt with your other libraries:
- “fileupload” capability is attached to a cloned form from the original form, to manage each single file individually to prevent conflicts of concurrent uploads.
- “fileInput” and “autoUpload” are disabled because we start the upload manually using “send” at the end of the function.
- “multipart” is disabled because I assume not to have found a working solution that does not break the file integrity ¯_(ツ)_/¯.
- The header “Content-Type” is filled with the file type as of pre-signed URL generation, otherwise S3 would reject the request.
- “paramName” is an arbitrary string to enforce a non-nested parameter name, which would not be correctly handled by S3.
- “dataType” is more or less arbitrarily set to XML, which is the format of S3 responses.
function uploadFileUsingPresignedURL(file, upload_url, upload_key) {
  const tmp_form = form.clone()

  tmp_form.fileupload({
    fileInput: null,
    url: upload_url,
    type: 'PUT',
    autoUpload: false,
    multipart: false,
    paramName: 'file',
    dataType: 'XML',
    beforeSend: function (xhr) {
      xhr.setRequestHeader('Content-Type', file.type)
    },
    done: function () {
      // go to step 3
      requestRecordCreation(upload_key)
    },
  }) // sending one file at a time
  tmp_form.fileupload('send', { files: [file] })
}
In order to allow file uploads from browsers to S3, you have to update CORS settings of your bucket:
[
  {
    "AllowedHeaders": ["*"],
    "AllowedMethods": ["PUT"],
    "AllowedOrigins": [
      "http://127.0.0.1:3000", // local development
      "https://your-domain.com", // production
      "https://*.your-domain.com" // production
    ],
    "ExposeHeaders": []
  }
]
3. Request record creation
Once upload is done, the browser can notify the application that the file is ready for being referenced into an Attachment record. This is more or less a standard “create” request on Attachment’s controller, to which we simply inject the upload_key obtained at step 1:
function requestRecordCreation(upload_key) {
  $.ajax({
    url: "/attachments",
    method: "POST",
    dataType: "json",
    data: {
      authenticity_token: <VALID_AUTHENTICITY_TOKEN>,
      upload_key:         upload_key,
      attachment: {
        attachable_type:  <ATTACHABLE_TYPE>,
        attachable_id:    <ATTACHABLE_ID>,
        // put here other attributes if required
      }
    },
    success: function () {
      // operation completed (step 6)
    }
  })
}
On the backend, the controller would start looking like to that crazy standard implementation:
class AttachmentsController < ApplicationController
  # POST /attachments
  def create
    @attachment = Attachment.new(attachment_params)

    upload_key = params[:upload_key]    ### STEPS 4-5-6 ###
  end

  private
  def attachment_params
    params.require(:attachment).permit(
      :attachable_type,
      :attachable_id,
      # put here others attributes' form if required
    )
  end
end
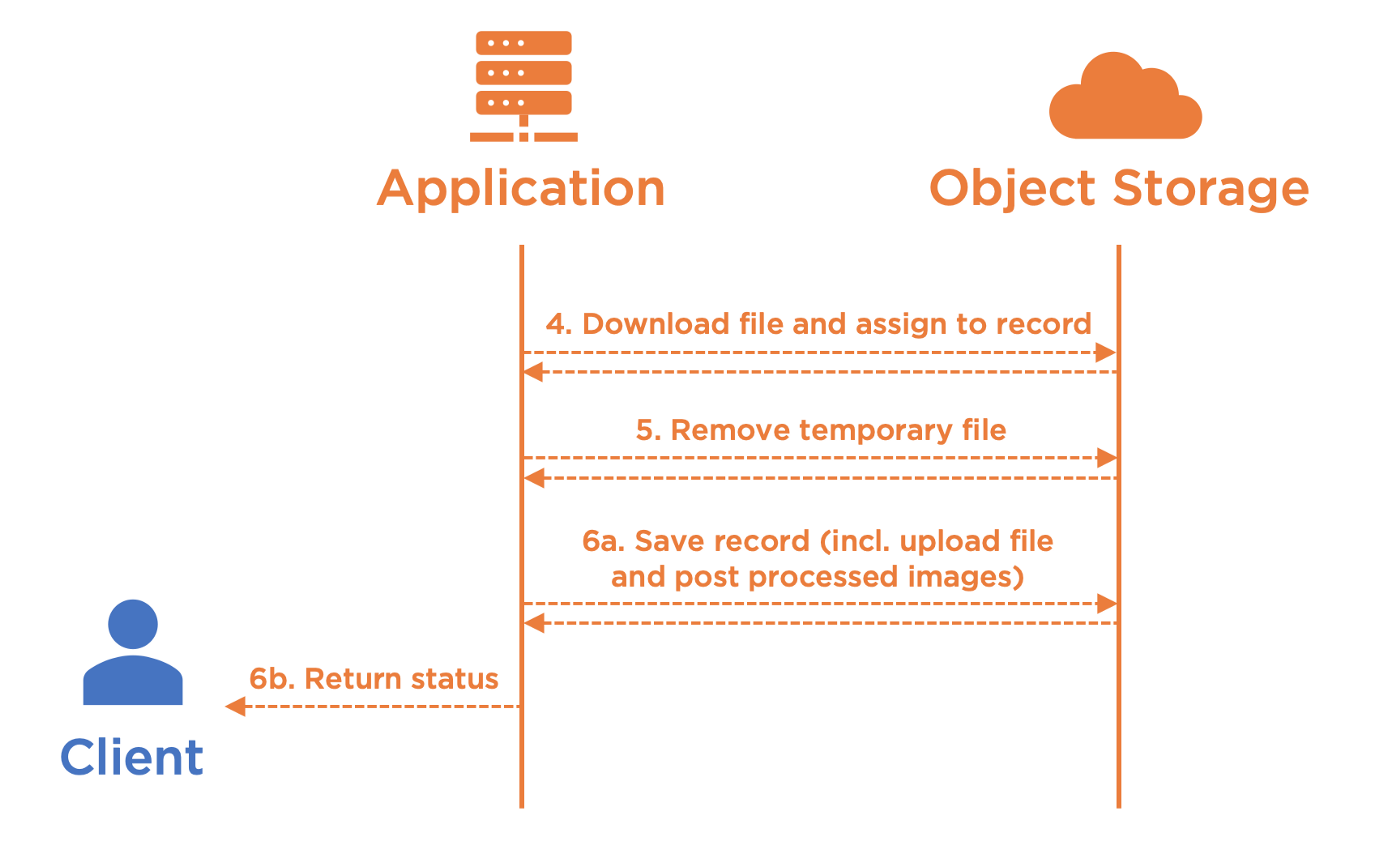
4. Request file metadata or content
Here is the tricky part of the implementation, and its easiness depends on the use cases you need to handle. You may also want to handle both proposed approaches depending on attachment types, when you have multiple ones in your application.
Let’s start with the easiest one, and to some extent the safest one, which consists in letting Paperclip doing the job as if it was a simple file upload. The idea is to download the file back on the application layer and assign it to the record, so that all features that come with Paperclip work in a standard way. That also means that the application triggers an extra upload of the file to the object storage on record save, which sounds expensive, but we can rely on the fact that we “control” this part of the network, as mentioned in the blog post introduction.
If the cost of doing so is too expensive for your use case, you may be interested in the second proposed approach, which consists in faking the IO part of Paperclip by manually assembling all required information. This approach is cost-free because it just needs a few simple API requests, but it has a few limitations:
- Post Processing are not triggered and you need to implement them in a different way, for instance in a background job (which sounds good by the way).
- Fingerprint must be set with the default algorithm (Digest::MD5), based on what S3 is able to provide through ETag header and given that S3 encryption is set to SSE-S3 or plaintext.
- You have added hard validations on the file type or content, that require the file is physically present on the record while saving it.
- The path builder requires the primary key (by default :id_partition or commonly :id) and your database does not provide safe ways to predict the next value. If this is the only one limitation, a workaround consists in switching steps 5 and 6 together (save the record first, and then move the file to the final location), but this is not covered in the present example.
- Any other limitation I have not been able to cover while writing this blog post :-)
Let’s go for the implementation of both solutions, differentiated by the boolean REQUIRES_DOWNLOAD, starting by building back the upload_path and retrieving bucket name accordingly with step 1:
class AttachmentsController < ApplicationController
  # POST /attachments
  def create
    @attachment = Attachment.new(attachment_params)

    upload_key  = params[:upload_key]
    upload_path = "direct_file_uploads/#{upload_key}"
    bucket      = Paperclip::Attachment.default_options[:bucket]    if REQUIRES_DOWNLOAD
      # [...]
    else
      # [...]
    end

    ### STEP 6 ###
  end

  # [...]
end
The first approach is simple:
- Obtain a pre-signed URL to download the file. Note that it does not trigger any real API request.
- Ensure to have registered Paperclip::UriAdapter, and do it only once from an initialiser file such as
config/initializers/paperclip.rb. I have simply put it here to facilitate the reading. - Assign the URL to the attachment using URI, and let’s Paperclip’s internal IO adapter processing the file.
if REQUIRES_DOWNLOAD
  download_url = STORAGE.directories.new(key: bucket)
                        .files.new(key: upload_path)
                        .url(Time.current + 10.seconds)  Paperclip::UriAdapter.register
  @attachment.upload = URI(download_url)
else
  # [...]
end
The second approach is custom because we need to fake Paperclip’s internals so that it builds valid paths. Paperclip uses interpolations based on :path setting. Each interpolation is based on a record’s attribute or attached file metadata, so that we have to ensure that all of them are pre-filled before calling the path builder:
- “file_name”, “file_size”, “content_type” and “updated_at” are standard attributes brought by Paperclip when you follow the installation guidelines, whereas “fingerprint” is only applicable if you have enabled it explicitly.
- The sequence related to the primary key is only applicable if it is part of :path or :hash_data settings.
- “file_name” is inferred directly from upload_path. We have made it possible at step 1.
- “file_size” and “content_type” are obtained from object’s headers.
- “updated_at” is an arbitrary timestamp, expected to be the current time.
- “fingerprint” is obtained from ETag header (MD5 digest of the content)
- The value of the primary key of the record (which is not yet saved at this stage) is obtained using “nextval()” on the given sequence (PostgreSQL only). If you are using UUIDs, you would have certainly implemented a custom interpolation and so you are required to generate it manually at this stage. If you are using MySQL, I suggest to follow workarounds such as this one.
if REQUIRES_DOWNLOAD
  # [...]
else
  headers = STORAGE.head_object(bucket, upload_path)[:headers]
  @attachment.upload_file_name    = upload_path.split('/').last
  @attachment.upload_file_size    = headers['Content-Length']
  @attachment.upload_content_type = headers['Content-Type']
  @attachment.upload_updated_at   = Time.current
  @attachment.upload_fingerprint  = headers['ETag'].gsub(/"/,'')

  primary_key = @attachment.class.primary_key
  primary_key_sequence =
    ActiveRecord::Base.connection.execute("
      SELECT nextval(pg_get_serial_sequence(
        '#{@attachment.class.table_name}', '#{primary_key}'
      ))
    ")
  primary_key_nextval = primary_key_sequence.first['nextval']
  @attachment.public_send("#{primary_key}=", primary_key_nextval)  ### STEP 5 ###
end
5. Move uploaded file to the right location
When the first approach is chosen (REQUIRES_DOWNLOAD), the file is automatically uploaded to the right location by Paperclip, among with the post processed images, while saving the file at step 6.
When the second approach is chosen (!REQUIRES_DOWNLOAD), this operation must be done manually. We have previously assigned all required attributes for PaperclipAttachment#path to return the correct path of the file, so the operation simply consists in moving the file to that final destination. Thus, S3-compatible storage does not support “moving” files, therefore we have to make a “copy” using copy_object. This request is a simple API request that does not require any data transfer between the application and the storage, the copy of the file is processed on S3 side.
Finally, both approaches result in a duplicate file (the original one uploaded by the client at step 2) that remains on S3 with no use case except debug or history. I suggest to delete it using delete_object, so that your bucket size does not grow at double speed:
if REQUIRES_DOWNLOAD
  # [...]
else
  # [...]
  final_path = @attachment.upload.path  STORAGE.copy_object(bucket, upload_path, bucket, final_path)
endSTORAGE.delete_object(bucket, upload_path)
Going a bit further is still required if you have enabled the versioning on your storage, and deletion is indeed a simple delete marker. To permanently delete the file, we have to perform a specific request using get_bucket_object_versions and retrieve the version identifier of the object to append it to the delete_object request:
options = nil
if STORAGE_VERSIONING_ENABLED
  versions =
    STORAGE.get_bucket_object_versions(bucket, prefix: upload_path)  version = versions.body['Versions'].first['Version']
  options = { 'versionId' => version['VersionId'] }
end
STORAGE.delete_object(bucket, upload_path, options)
6. Save record and return status
We are finally ready to save the record and return the status to the client, as we would do with any kind of ActiveRecord objects or if we were using simple file upload:
def create
  # [...]

  if @attachment.save
    render json: @attachment, status: :created
  else
    render json: @attachment.errors, status: :unprocessable_entity
  end
end
Code source
You will find a working example in this sample app that covers all mentioned use cases, with a bit more logic.